How to work with macros in Excel without code programming
Using Macros in Excel allows you extending the program’s features significantly. They help turning the work of the program into an automatic process and take the majority most of the user's routine work on themselves. You simply need learning to use Macros to increase your productivity in tens of times.
No one person recording Macros must be a specialist – a programmer. He may not know the programming VBA language when making his own Macro programs using the Macro Recorder.
Please, enable the «DEVELOPER» panel. Just open the Options group in the File menu. In the “Excel Options” window that will be opened then, find the “Customize Ribbon” group. Pay attention to the right column of settings under the same name as “Ribbon Setup”. There tick the «DEVELOPER» tab – you can see it clearly at the photo.

Now you have a new «DEVELOPER» tab available with all our tools for automating work in Excel and creating Macros.
Using VBA and Macros in Microsoft Excel
Macros are internal applications that always perform all the routine work, making life easier for the PC user. Each user can create a Macro even without knowledge of programming languages. To do this, use special command button runs it. In this mode, all actions of the Macro Recorder in Excel are recorded by translating the VBA code into the programming language in automatic mode. After the end of the recording, we get a ready-made program that performs the actions that the user made when writing it.
Recording Macros in Excel process
Recording Macros process is surprisingly simple. Just be extremely attentive when following these steps.
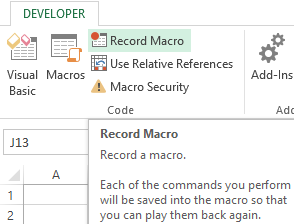
- Push Macro Recorder button on the «DEVELOPER» tab.
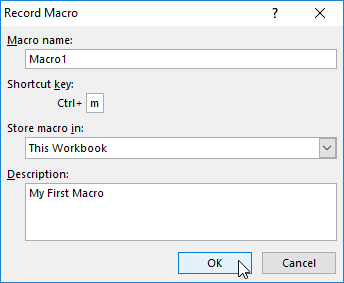
- When you get the dialogue window, fill it in with Macros parameters and push OK button.
- When you finish the process, click «Stop recording» button. After this action the Macro will be automatically saved.
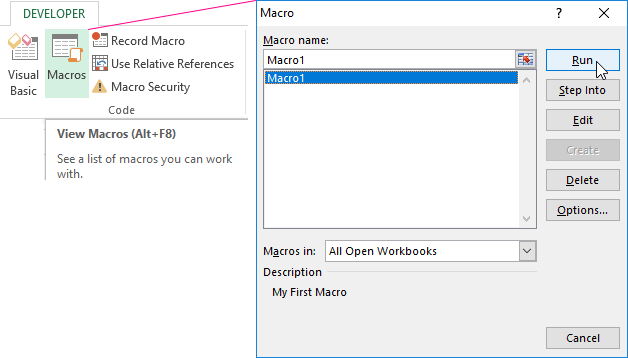
- To execute or edit the recorded Macro, pick the «Macros» button or choose ALT + F8 combination. A window with a list of recorded Macros and buttons for managing them will appear after it.

Using of Macro programs, you can increase the user's productivity (up to dozens of times!). However, to record the user macros for 100% correctly, you must follow uncomplicated rules that significantly affect their quality at the time of recording them and performance.
Working with Macros in Excel
Follow these five simple tips, and they will help you creating Macros without programming. Take advantage of these simple recommendations that allow you to create high-quality Macro programs automatically, doing it quickly and easily.
1. Use correct names in Macros
Give your Macros short, but meaningful names. When you sympathize with the whole procedure, you will start creating many Macros. It will be easier for you finding short and meaningful names. The VBA system permits you specifying a description for the name. Be sure to always use it. The Macros name must always (!) start with letters and it cannot contain any spaces, different symbols or various punctuation marks. After the first character, you can use numbers or underscores, but the maximum name length is only eighty characters.
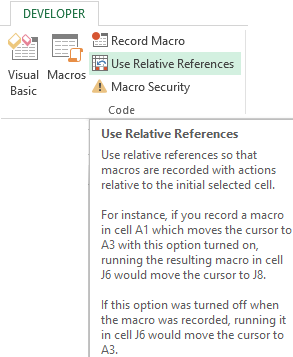
2. Use Relative and Absolute Cell References
The absolute cell reference is the exact location of the cursor when information about its location is recorded in Macro addresses with a rigid binding to a specific cell at the time of recording. Absolute references limit the capabilities of the Macros if you add or even remove data on an Excel document – the data list will become larger. Relative tools (references) do not bind the cursor to a specific cell address. Excel uses a default “Absolute” mode; however you can always change it by turning on the «Use Relative References» button located below the Macro Recorder button on the toolbar of the «DEVELOPER» tab.
3. Always start recording Macros with A1 cell position
The absolute counting of cells is always carried out from the initial (home) position A1 to the address of the cursor with your data. If you saved your Macro in the personal Macros book (we do recommend always performing it), then you can use your program on other worksheets with similar data. It never matters when you place your cursor, when you start recording a Macro. Even if it is already located in A1 cell, your first Macro must be best written after pressing Ctrl + Home keys. We will give you an example. Imagine that every month you get dozens of tables from all branches. You need organizing data and make necessary calculations for a monthly report. Performing all of these functions, record your Macro.
4. Use special direction keys when recording a Macro
Use the special “arrow” keys to control the cursor (Ctrl + Up, etc.). Using these direction keys, you can simply add, easily change or even completely delete data within the table as it is needed. Using a computer mouse for recording actions is not convenient and so much reliable. Forget about using a mouse working with Macros in Excel.
5. Create Macros for specific small tasks
Keep your Macros for small specific tasks. The more complicated code, the slower they work, especially if it is required performing many functions or calculating various formulas in a large table. When you run each process separately, you can quickly view the results to verify the accuracy of their execution. When you cannot “break” a long Macro into short units, but you want to test its functionality, do it step-by-step. Press F8 each time you want to go to the next step in the task. The process of executing the program stops when it sees an error. You can fix an error that is easy to find by debugging it or writing it in a new way.
