How to Remove Spaces from Text Using TRIM Function in Excel
Not everyone notices extra spaces in text. It might not seem important, but in Excel, this can cause serious problems since commands won't work correctly if cells contain additional spaces.
How can you remove extra spaces in Excel automatically? Instead of straining your eyes by manually deleting each space with Backspace, you can use a special function – TRIM.
TRIM Function Syntax in Excel
The name of the command might be tricky to pronounce, but understanding its syntax and functionality is simple. When you start typing the command, the following will appear: =TRIM(text). In the parentheses, just specify the cell (or cells) where you want to remove spaces.
Note: The function removes all extra spaces, except for the default single space between words.
Even proficient typists may wonder how extra spaces appear. However, experienced users know that Excel data often comes from various sources, possibly filled in by non-experts. This is why errors and unnecessary spaces occur.
Example of Using the TRIM Function
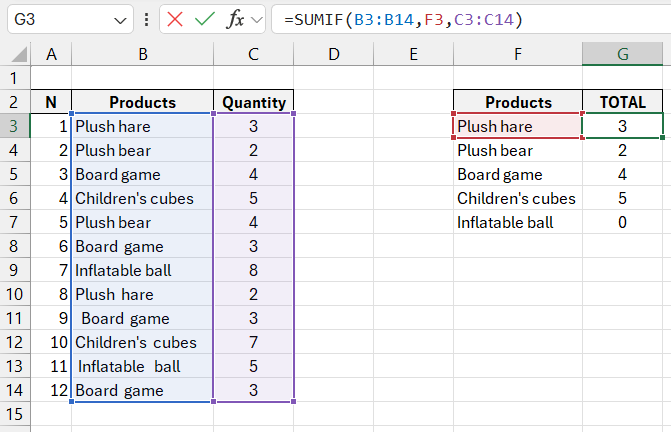
Let's look at a small example to understand how to use the TRIM function. We have a table listing children’s toys and their quantities. A careless operator has been managing the inventory: whenever additional units arrived, they simply added new entries, even though similar items were already listed. Our task is to calculate the total for each type of toy.
It’s visually clear that some entries have obvious extra spaces. Let’s see what impact this has.
We will calculate the total for each toy type using the SUMIF function. Enter the function, drag it down to the remaining cells, and check the result. The program shows that there are 3 teddy rabbits, but we can see it should be 3+2=5. What's the issue? Extra spaces.
We will enter the TRIM function in cell D3. As an argument, we will refer to cell B3, which contains the toy name.
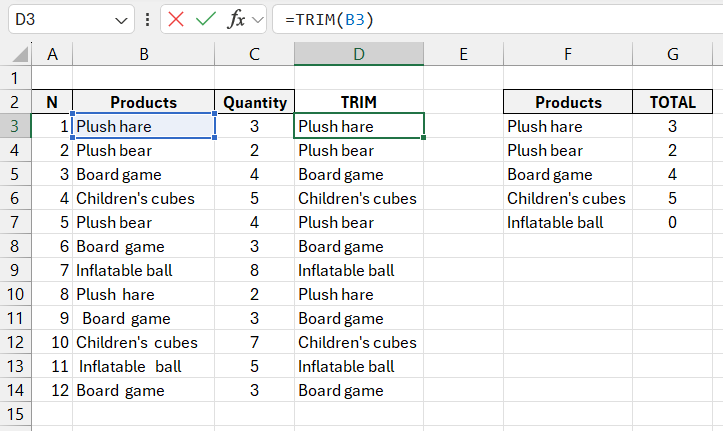
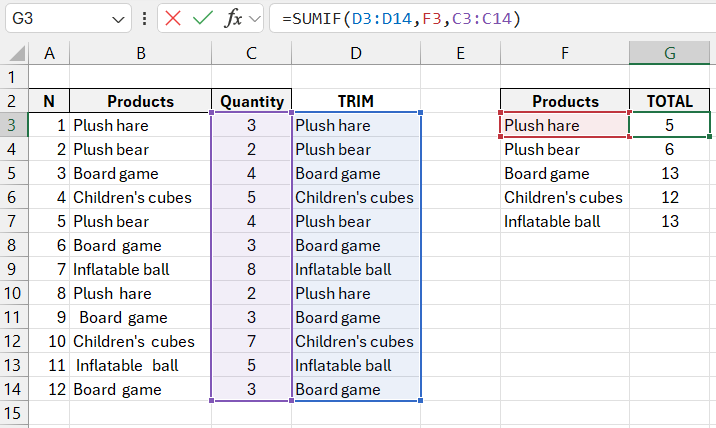
Now, drag the function down to row 14, and you’ll see that the text has been aligned correctly, as the spaces have been removed. To confirm, modify the range in the SUMIF function. Instead of B3:B14, enter D3:D14 and check the result. Now, there are indeed 5 teddy rabbits, 6 bears, etc. It turns out that spaces are important and need to be cleaned up.
=SUMIF(D3:D14,F3,C3:C14)
TRIM with Other Functions
Using TRIM with other functions expands its potential. It’s logical to use it with functions that analyze arrays and return data, such as FIND, LEFT, RIGHT, etc. In practice, TRIM is most commonly paired with VLOOKUP.
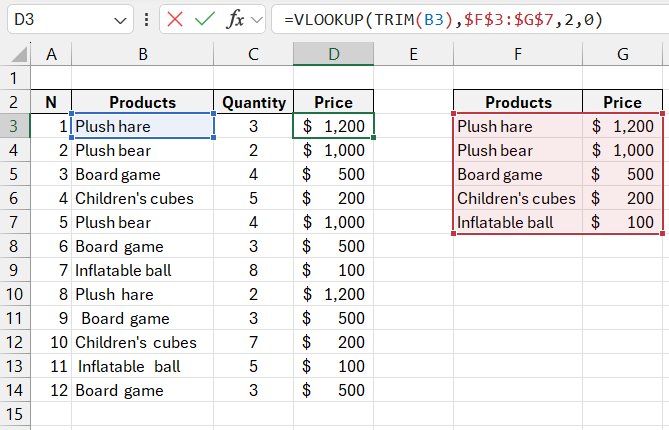
Let’s use the same table. The task is to assign prices for each item. A reference table with the price of each toy is provided on the right. While we could manually copy the prices, we’ll use VLOOKUP instead.
If we drag the formula down the table, we’ll see the following:
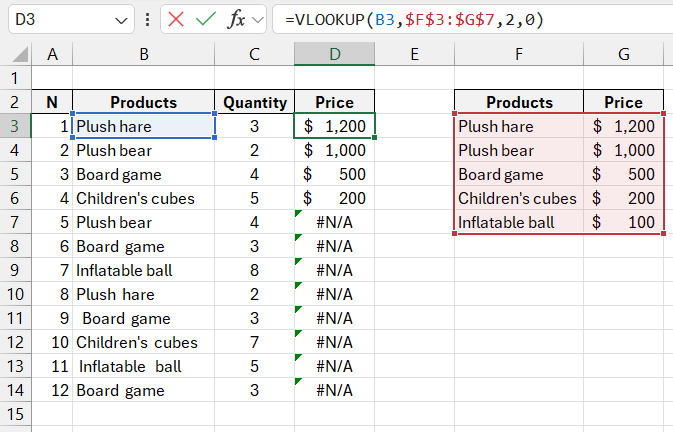
We have highlighted, in pink, the items that contain extra spaces. This is why the VLOOKUP function couldn’t return results for them. To fix this, we’ll add the TRIM function to VLOOKUP and see the result.
Since we need to remove spaces in the search value, we’ll place TRIM at the beginning of the VLOOKUP formula. The formula will look slightly different, but now, when we drag it down to the bottom of the table, the function will return the correct values. Everything is now accurate.
=VLOOKUP(TRIM(B3),$F$3:$G$7,2,0)
Download examples of using TRIM formula in Excel 
Other Ways to Remove Extra Spaces in Excel
Besides using the TRIM function, you can also remove extra spaces with the tried-and-true method known from WORD – the Find and Replace command.
Let’s stick with the same example. Select the column with toy names and press CTRL+H. In the pop-up window, type a space in the Find field, and leave the Replace with field empty.
The downside of this method is that it removes all spaces, including those between words. This approach is mainly used for removing extra spaces in numbers.
Learn how the TRIM function works and how it can be combined with other commands, as well as other ways to remove extra spaces in Excel.
