Moving and arranging of sheets in an Excel document
In this lesson we will learn how to work professionally with Excel sheets. Each file in this program is conditionally an «account book with sheets».
In the oldest versions of Excel and its progenitors: Lotus 1-2-3 and QuattroPro there was only one sheet. The total number of sheets can be in the Excel book 2010 – 255 pieces. Such an amount can hardly be called a limitation, but it will grow in future versions. Each sheet is the child table, that can be linked by formulas to other sheets and tables in one file. This greatly expands the capabilities of the program and improves the convenience of working with large amounts of data with direct or indirect communication with each other.
Even if we can place all the tables on one sheet, it is still more convenient to use by several separate sheets. For example, reports on monthly sales are best distributed separately by sheet. So much easier to work with. On different sheets, you can create links to compile summary reports for several months.
Creating of new sheets and recording data in ones simultaneously
In the cell A1 on four pages, you should write down the data: the quarter 1, the quarter 2, the quarter 3 and the quarter 4.
After opening the Excel workbook by default, the active Worksheet1 and the cell A1. Let's write in it the text: quarter 1.
On the second and third sheet, we enter the corresponding data: the quarter 2 and 3. We move by clicking on the labels below, or by using the hotkeys CTRL + PageUP and CTRL + PageDown to switch between worksheets in Excel.
We create the fourth sheet. To do this, click on the «insert sheet» tool button, which is located on the right side of the label of the last sheet.
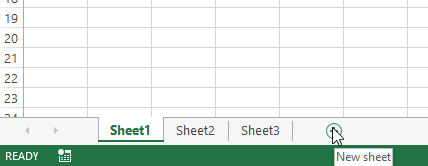
Or press the combination of hot keys SHIFT + F11.
When you press SHIFT + F11 combination, each new sheet is inserted to the right of the active sheet. And when you click on the «Insert sheet» tool, new sheets are added only after the last one.
There is another way to insert a new sheet between any other ones. Right-clicking on the desired next tab brings up a context menu, from which you should select the option «Insert».
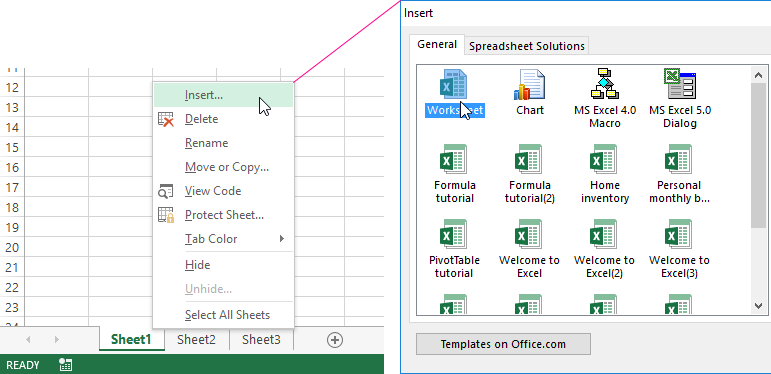
You will see an interesting dialog box that slightly expands the possibility of inserting new ones.
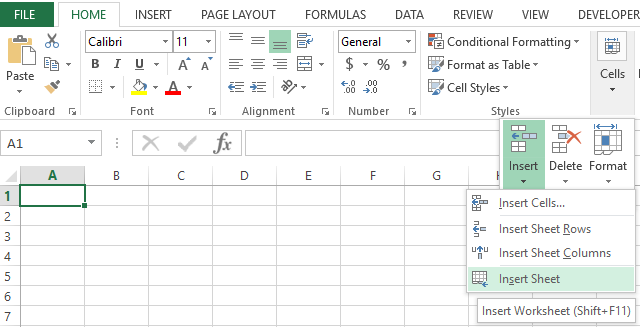
Or select: «HOME»-«Cells»-«Insert»-«Insert Sheet».
Any convenient solution for you.
Changing the sequence
In the newly created book, the sheets are ordered by default. If necessary, the sequence can be changed.
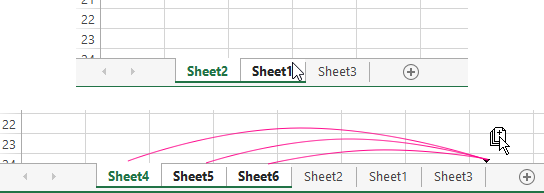
Hover your mouse over the sheet label that you want to move, holding the left key, move to the desired location between the other tabs. If you hold down the CTRL key while executing these actions, copying will occur. The source sheet will remain in its place, and the new one will move to the desired sequential place.
Renaming a name on a sheet label
The standard sheet names should be changed to: 2015-I, 2015-II, 2015-III, 2015-IV (in accordance with the annual quarters).
To do this, right-click on the sheet label to open the context menu. In it we select the «Rename» option, or just double-click the left mouse button directly on the sheet name.
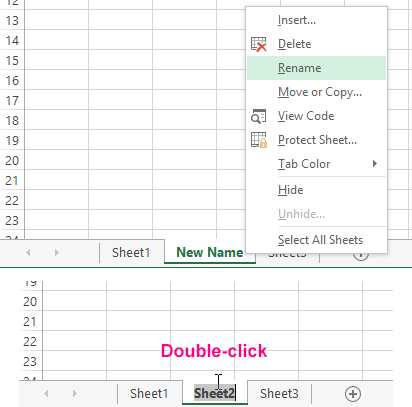
Now the title is highlighted and available for editing. Enter your name: «2015-I». To save changes, click anywhere in the list or press «Enter», and if you change your mind, press «ESC» to cancel renaming. In a similar way, we change all the corresponding names for each quarter.
The notation. One book cannot have the same sheet names: otherwise, there may be a name conflict when copying. The maximum length of the name is only 31 characters. Not allowed characters in the names: /? *:.
Copying sheets
Very often there is a need to copy an Excel sheet without losing data. For example, if you regularly copy the contents of cells, the column width and row height settings are not saved. It is much more efficient to copy not the content, but the entire sheet.
Hover your mouse over the bookmark of the sheet that you want to copy and hold the left key + CTRL, move the copy to the desired location between the other tabs.
Attention! Let's first release the mouse, and then CTRL.
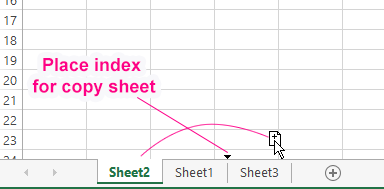
Notice the same actions as when moving, only with the CTRL key pressed on the keyboard.
Thus, monthly reports on incomes and expenses are often copied. Their structure is identical only the data and names of the month are changed.
Inserting data into multiple sheets at once
In the cell A1 for six sheets at the same time, we enter the text: monthly calculations.
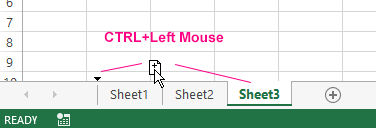
Left-click to activate the bookmark of the first sheet, holding down the CTRL key and activate two more tabs. Thus, you will have 3 active sheets at the same time.
The remark! The same result can be achieved if you activate the first sheet and hold down the SHIFT key to activate the last one. This method is more convenient when you need to allocate a lot and quickly.
Now on the «HOME» tab in the cell section, select «Insert» – «Insert Sheet» or press SHIFT + F11. At the same time, three more new sheets will be added. Now select 6 sheets as described above and in the cell A1 enter the text «monthly calculations» and press «Enter». So in one operation you entered the data at once on 6 sheets simultaneously! Check the result by periodically pressing CTRL + PageUp to move the sheets forward and PageDown – back.
Near the tabs on the left there is the effective tool for moving through the sheets. This tool allows you to go to the next / previous, the very first / the most last sheet.
If the book contains many sheets, you can reduce the width of the bottom scroll bar horizontally. To do this, move the mouse cursor to the edge of the scrollbar, holding down the left key to reduce its size, so you can see more bookmarks. Double-clicking on the same edge of the scroll bar returns its standard size.
The alternative ways of moving through sheets
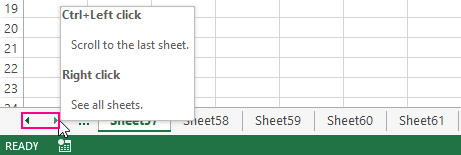
When the book has several dozen sheets, you need additional effective tools for navigating through ones. For example, very convenient context menu, that is called by the right mouse button on the bookmark navigation tool (it located to the left of the bookmarks).
Choose, passing quickly and conveniently. This menu contains up to 15 sheets, but at the bottom there is an option «All sheets».
The notice! If the option «All Sheets» is displayed, then the book contains more than 15 pieces ones. In another case, the option is not available and is not displayed.
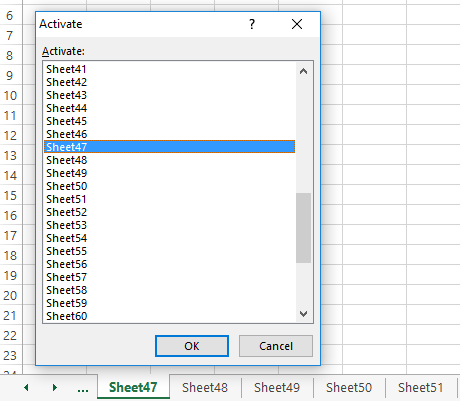
After selecting this item, the window «Go to the current book» appears, in which all 255 sheets can be displayed. Choose from the list and click OK.
Removal of a sheet
You can delete sheets in two ways:
- From the context menu called by the right mouse button on the sheet tab of which you want to delete, select the «Delete» option.
- On the tab of the «HOME» tool bars in the «Cells» section, select the «Delete» – «Delete sheet» menu options.
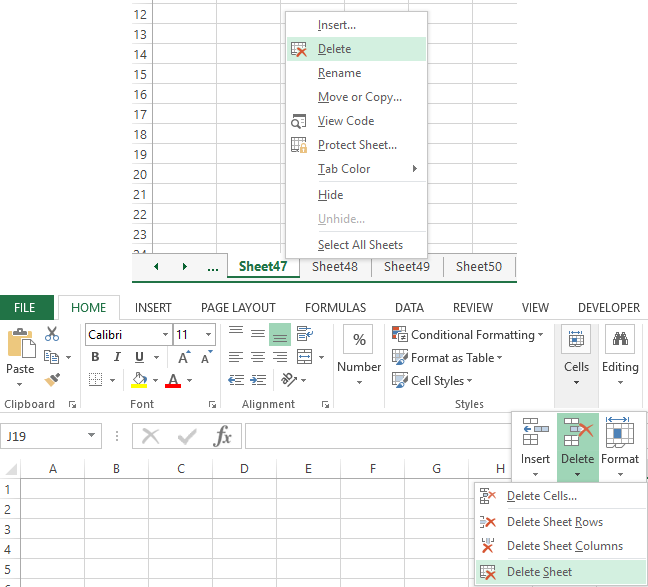
If the deleted sheet is not empty, the warning appears to confirm the deletion.
Attention! Remember, you can not restore a deleted sheet in Excel!
If you select several sheets, as described above, then all of them can be deleted at the same time.

Data Visualization Charts for Interactive Report Creation in Excel.
Dashboard Templates