How to fill cells in Excel with large tables automatically
In Excel, there are many ways to quickly and efficiently fill cells with data. Everyone knows that laziness – is the engine of progress. Know about this and the developers.
To fill in the data you have to spend most of the time on boring and routine work. For example, filling in the time sheet or the invoice, etc.
Let`s consider the techniques of automatic and semi-automatic filling in Excel. And also, what tools have spreadsheets to facilitate the user's work. We will learn how to apply them in practice and find out how effective they are.
How in Excel to fill cells with the same values?
At first, let's look at how to automatically fill the cells in Excel. For example, we are filling in the half-empty initial table.
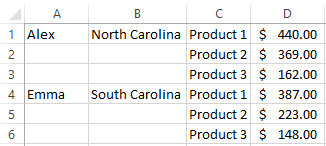
This is the small nameplate: only for this example and it could be filled in manually. But in practice, sometimes you have to fill in 30 thousand lines. To not fill this source table manually, you should create a formula to fill in Excel data by automatically. To do this, perform the series of sequential actions:
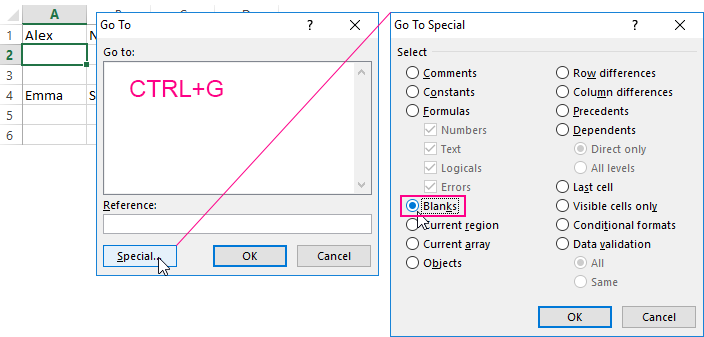
- Go to any empty cell in the source table.
- Select the tool: «HOME» – «Find and select» – «Go To» (or to press the hot keys CTRL + G).
- In the window that appears, click the «Special» button.
- In the window that appears, select the option «Blanks» and click OK. All empty cells are highlighted.
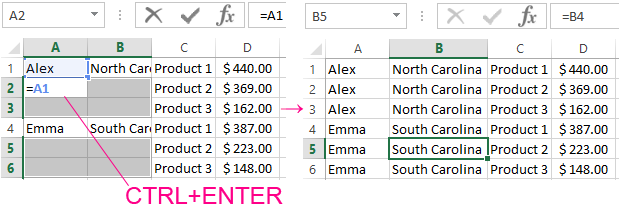
- Now enter the formula «=A1» and press CTRL + Enter. This is how the empty cells in Excel are filled with the previous value – automatically.
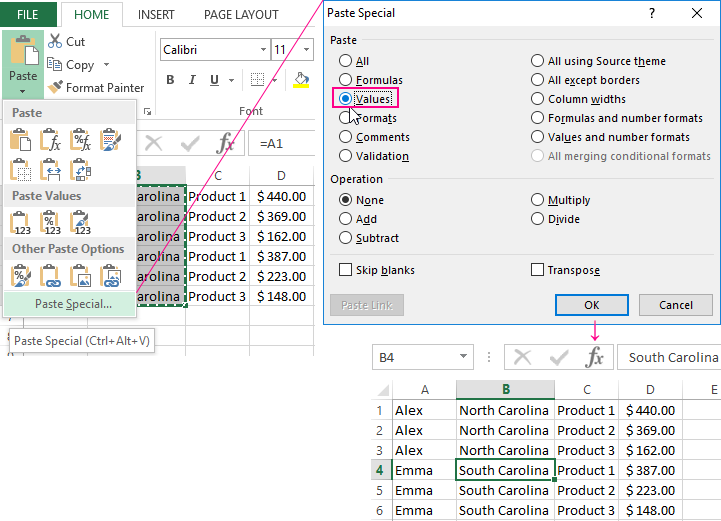
- Highlight the columns A:B and copy its contents.
- Select the tool: «HOME» – «Paste» – «Paste Special» (or press CTRL + ALT + V).
- In the window that appears, select the «Value» option and click OK. Now the original table is filled not just with formulas, but with natural values of the cells.
When filling 30 thousand lines it is impossible not to make mistakes. The above method not only saves forces and time, but also eliminates the occurrence of errors caused by the human factor.
Attention! In the 5-th paragraph, the table was beautifully filled without errors, since our active cell was at address A2, after completing the 4-th item. When using this method, be careful and watch where the active cell is after the selection. It is important where it will take its values.
Semi-automatic filling of the cells in Excel from the drop-down list
Now in semi-automatic mode you can fill the empty cells. There are only a few values that are repeated in sequential or in random order.
In the new source table, automatically fill in the columns C and D with the data corresponding to them.
- Fill in the column headings C1 – «Date» and D1 – «Payment Type».
- In the cell C2, enter the date 06/15/2018.
- In the cells C2:C4 the dates are repeated, therefore, you need to select the range C2:C4 and press CTRL+D to automatically fill the cells with the previous values.
- Enter the current date in the cell C5. To do this, press CTRL +; (the semicolon on the English keyboard layout). Fill in the current dates with the column C to the end of the table.
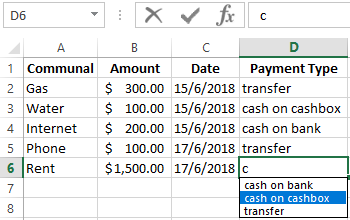
- The range of the cells D2:D4 you need to fill as shown below in the picture.
- In the cell D5 to enter the first letter «p», and then the word is not necessary to fill. It is enough to press the Enter key.
- In the cell D6, after entering the first letter «с», do not display part of the word for auto-fill. Therefore, you need to press ALT + ↓ (arrow down) to bring up the drop-down list. Select the value «cash on cashbox» in the arrow keys or the mouse pointer and press Enter.
This semiautomatic method of data entry allows several times to speed up and facilitate the process of working with tables.
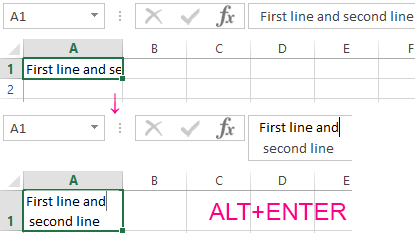
Attention! If the value consists of several lines, then when you press the ALT + (down arrow) combination, it will not be displayed in the drop-down list of values.
To split the value into strings using the ALT + Enter key combination. Thus, the text is divided into rows within the same cell.
Note. Notice how we entered the current date in step 4 using the hotkeys (CTRL +;). It is very convenient! And when you press CTRL + SHIFT +; we get the current time.
