Printing Excel spreadsheet with the settings
In Excel a lot of attention is paid to the preparation of a document for printing. The print settings are significantly larger than in Word.
To prepare the tables and presentably place ones on sheets of paper using a printer, you will be familiar with all the settings of the program. Especially for you in this article in detail the «Print» dialog box was disassembled.
Printing of an Excel document
To print a document in Excel, there are 2 basic ways:
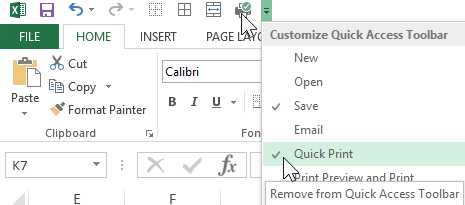
- Quickly and without settings. Click to the «Quick print» tool on the Quick Access toolbar, and the document immediately depart to the printer, without any controls fields and parameters. But still after pressing this button, the printer does not start immediately, the printer settings dialog box appears only.
- With preview and settings. Select «File» – «Print» (or press the combination of hot keys CTRL + P).
The dialog box will appear to configure the print and preview settings. This method will be discussed in more detail below.
How can I set up printing in Excel?
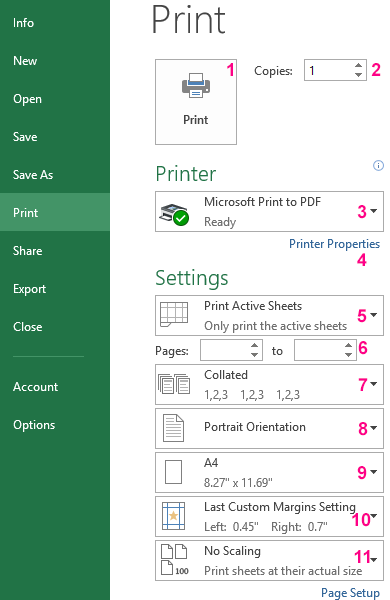
There is detailed parsing of print parameters and the value of buttons and options of parameters:
- Printing – prints the document data to the printer, taking into account all settings and options.
- Copies – are the number of exemplars of a printed document. The default is 1. You can enter a value from the keyboard or use the arrows.
- The printer model – while working on the local network, this item can contain a whole list of printers. One computer can also be connected to more than one printer. In addition, this option displays faxes and virtual printers for generating PDF files.
- Printer Properties – clicking on this link, the dialog box for setting the parameters of the selected printer is opened. These parameters are depend from the model and type of the printing device.
- Print Active Sheets – the default option is to print only active sheets, but if you click on it, the list of additional options will open: «Print the entire book» (to print data for printing the entire Excel workbook) and «Print selected fragment» (to print only the data range). These names are spoken for their functions. Also in this list is the option «Ignore print area» available. It operates in the switch mode and can be activated / deactivated together with any of the above described options. It can be used when a print area is specified, and it needs to be ignored, or it is worth using this function when printing a blank page from Excel. This means that the print area is set incorrectly and should be ignored.
- Pages – here you can set the range of page numbers that you want to print. For example, print only from the 5-th to the 12-th page.
- Collated – this function is selected by default. This means that if a document is printed in several copies, the first copy will be printed first, then the second, the third, and so on. This function can be switched to another mode «Uncollated» – this means that first all the first pages of all copies will be printed, then only the second pages, the third ones, etc.
- Portrait orientation – the choice orientation of the page, which can be changed to landscape orientation.
- A4 - here you can specify the paper size, on which the printer will be printed. There are many formats available for selection in the list, but even if you do not find a suitable format, then for you the option is available below the list: «Other page sizes» where you can find your format in the «Page Setup» dialog box. There, in the «Paper Size» list, all the formats of the «International Standard ISO 216» are provided. Also included are paper formats: «North American Standard» and «Japanese Standard».
- Last Custom Margins Setting – by default, this setting provides custom values. For convenience, 3 ready-made and already customized field templates are provided: «Normal», «Wide», «Narrow».
- No scaling – this parameter to adjust the size of the data scale, which will be placed on the sheets of paper. For convenience, there are 3 page scaling templates: «Fit Sheet on One Page» (this parameter template allows you to print a table in Excel on one sheet), «Fit All Columns on One Page», «Fit All Rows on One Page». For custom settings, the option «Custom scaling options» is available, that, when selected, opens all the «Page Setup» window. For example, if you need to increase the scale of printing in Excel or reduce, then you can make your own custom settings in the appropriate section. Thus, you can, for example, reduce the table in Excel for printing on a single sheet.
Attention! Do not look for duplex settings in these settings. This function should be supported by your printer and configured in its parameters (see step 4).
